Packaging
Next steps to more robust, reliable and efficient programming in R.
Welcome back everyone! Today we will have a look at
- How to write your own package in R
- Automation in R
Writing Packages in R 📦
First of all, there is a very nice cheat sheet on package development.
Remember the overall workflow of creating a package:
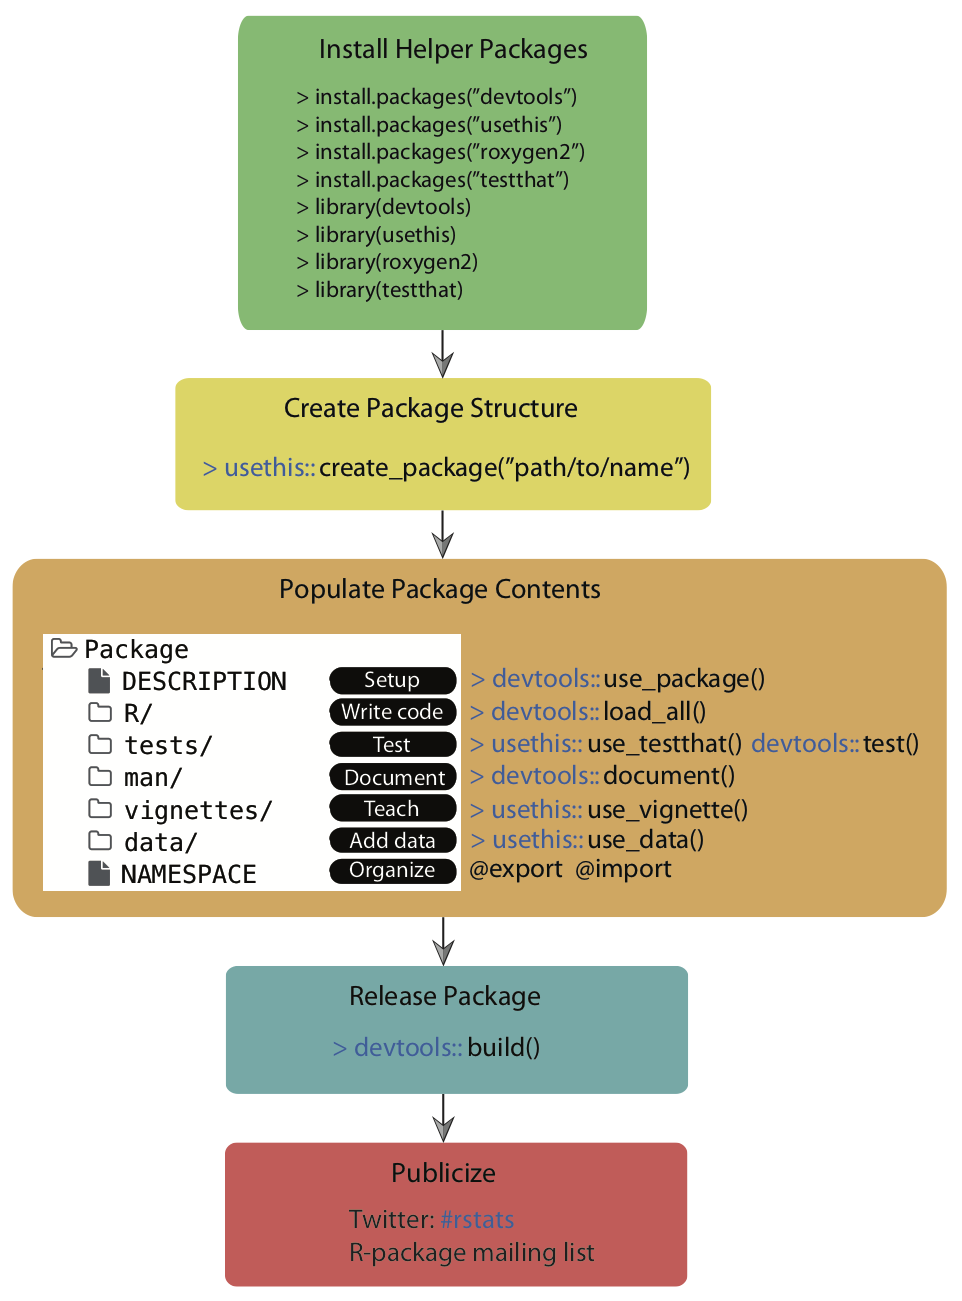
Source: Simo Goshev & Steve Worthinton
We now run through the development of a small toy package.
Note: In this minimal example, we won’t sync the package to GitHub as not to overload information and won’t do version control via Git. In principle, it is strongly recommended to use Git for version control during the process.
Step 1: Load the packages you will need
Load the devtools package, which is the public face of a
set of packages that support various aspects of package development.
Also load the roxygen2 package, which provides helper
functions to document your package.
Step 2: Create your package directory 🏠
You are going to create a directory with the bare minimum folders of R packages. We are going to make a very tiny package providing only a single function as an illustration.
Call create_package() from the usethis
package, which is loaded when you load devtools, to
initialize a new package in a directory on your computer (and create the
directory, if necessary). Make a deliberate choice about where to create
this package on your computer. It should probably be somewhere within
your home directory, alongside your other R projects. It should not be
nested inside another RStudio Project, R package, or Git repo. Nor
should it be in an R package library, which holds packages that have
already been built and installed. The conversion of the source package
we are creating here into an installed package is part of what devtools
facilitates. Don’t try to do devtools’ job for it!
Substitute your chosen path into a create_package() call
like this:
create_package("./awesomepackage", open = FALSE)
# create_package("~/Documents/R/awesomepackage", open = FALSE)
Also, let’s navigate into that directory, which will allow us to use some fancy functions down the line.
Step 3: Add your functions
Now it’s time to add the functions you want to create the package for. Let’s just work with a toy function here:
Some years ago, there used to be an issue when you tried to
concatenate two factors (see this stackoverflow discussion).
By now, the problem has been solved in the forcats package,
but let’s pretend it has not.
For whatever reason, the result of concatenating two factors used to
be an integer vector consisting of the numbers 1,
2, 3, and 4. A possible solution
would have been to coerce each factor to a character type, concatenate,
and then re-convert to a factor type.
a <- factor(c("character", "hits", "your", "eyeballs"))
b <- factor(c("but", "integer", "where it", "counts"))

c(a, b) # used to cause troubles in the past

factor(c(as.character(a), as.character(b))) # was a common workaround (no longer necessary)
Let’s drop that logic into the body of a function called
fbind():
Save this function as an R file, fbind.R, to the R
directory in your package folder.
Alternatively, you can use the helper function
use_r()from the usethis package, which
automatically creates and/or opens a script below R/:
Step 4: Add documention 🎥
While not strictly necessary, it’s useful for Future-You and anybody else who you might use your package to provide some documentation for your function. Luckily, there’s another tool to help with this. All you have to do is add a comment like the following at the beginning of the script containing your function:
#' Bind two factors
#'
#' Create a new factor from two existing factors, where the new factor's levels
#' are the union of the levels of the input factors.
#'
#' @param a factor
#' @param b factor
#'
#' @return factor
#' @export
#' @examples
#' fbind(iris$Species[c(1, 51, 101)], PlantGrowth$group[c(1, 11, 21)])
Then, you can run document() from roxygen2 to
automatically create the documentation for you:
You should now be able to preview your help file like so:
Step 5: Install!
Now it is as simple as installing the package! You need to run this from the parent working directory that contains the package folder.
Now you have a real, live, functioning R package. For example, try
typing ?fbind. You should see the standard help page pop
up!
Step 7: Add a license 🏷
The field of (software) licensing is complex. Check out this resource for starters. In terms of open source licenses, there are two major types:
- Permissive licences: easy-going; can be freely
copied, modified, and published. (examples: MIT, Apache)
- Copyleft licenses: can be freely copied and modified for personal use, but publishing may be restricted. (example: GPL)
The usethis package comes with helper functions to add
various licenses with minimal effort.
Things can become more complicated when you use other people’s code and want to bundle it with yours. The licenses may not be compatible… see more here.
More detailed information on R package licenses can be found here for more information.
Additional steps
In case you’re having a nice idea for an actual package, please take a look at some much more in-depth explanations, e.g. by Hadley Wickham and Jenny Bryan: R packages, Chapter 2 “The whole game” or Karl Broman: R package primer. Here’s an overview of next steps you would follow:
- Iterative loading and testing ➡️
load_all() - Adding unit tests ➡️
use_testthat() - Import functions from other packages ➡️
use_package() - Version control and collaboration ➡️
use_github() - Add a proper public description ➡️
use_readme_rmd() - Add vignettes ➡️
use_vignette() - Submit to CRAN ➡️
devtools::build(),devtools::release()
Exercise
Since we do not have an assignment for this session, let’s spend some time building our own package and publishing it to a public GitHub repository.
Here are the requirements:
- It should contain at least one function that you yourself have written. The function does not have to do anything innovative. Anything works really.
- It should contain all the necessary package components.
- The repository should contain a
README.mdthat briefly describes what the package/function does. - Anyone should be able to install your package using
devtools::install_github("<your-github-account-name>/<your-package-name>").
Automation in R
We won’t cover automation in the lab today, but here is a summary of helpful resources in case you ever need to automate your workflow:
1. Organize the workflow of a complex project
- by running multiple scripts through a “master” R-script - see master.R example
- by running multiple scripts through a shell script - see master.sh example
- by using an R make-file - see makefile example. Note that an alternative package to use here would be targets
2. Schedule reoccurring tasks
- using the tashscheduleR package in R
- through the command line using
schtasks.exe - through the Windows Task Scheduler
- on macOS you would use cron or launchd
Sources
The packaging tutorial draws heavily on resources by Hilary Parker: Writing an R package from scratch, Hadley Wickham and Jenny Bryan: R packages, Chapter 2 “The whole game” and Karl Broman: R package primer
A work by Lisa Oswald & Tom Arend
Prepared for Intro to Data Science, taught by Simon Munzert