Now known as SAP Commerce Cloud, is a comprehensive e-commerce platform designed to help businesses create, manage, and optimize digital commerce experiences across multiple channels. It offers features for product content management, customer experience management, and integrated marketing capabilities.
The platform is built on a unified core that provides key services and models tailored specifically for commerce, accessible across all functional modules. Additional modules extend the platform's capabilities with services like the API registry and support for search and navigation functionalities.
SAP Commerce is highly flexible and extensible, allowing businesses to create personalized commerce solutions. Its architecture leverages multiple abstraction layers and a modular design, enabling customization and scalability to meet specific business needs.
SAP Commerce is a modular, extensible platform that integrates deeply with SAP's broader ecosystem, enabling businesses to deliver scalable and unique commerce experiences across various channels. Its flexibility ensures that it can adapt to diverse business requirements while maintaining seamless integration and consistency throughout operations.
The platform’s layered architecture and modular approach make it an ideal solution for businesses aiming for scalable, adaptable, and future-proof digital transformation in commerce.
The SAP Commerce Platform offers a range of features to support its core functionalities such as containerization, data management, synchronization, security, and localization. For example, the data report feature helps collect raw data from the SAP Commerce database and present it in an easily understandable report format.
SAP Commerce includes a build framework that handles many tasks, including code generation. It is extendable and supports tools like JRebel, which can help avoid unnecessary rebuilds during the development phase, improving efficiency.
The SAP Commerce Cache is an important part of the persistence layer, improving performance by reducing the number of database queries. It stores search results, item attributes, and item instances in memory, making data access faster.
Clustering refers to using multiple SAP Commerce installations that share data from a single database. The clustering functionality offers various configurable options for scaling your system effectively.
With containerization, SAP Commerce allows you to build Docker images and run them as isolated software instances. This makes it easier to deploy your system in different environments, ensuring compatibility without issues.
The platform offers a Data Retention Framework that enables you to define strategies for retaining or cleaning up specified data. The Item Locking Service helps you prevent data modifications or deletions when necessary.
SAP Commerce includes a data validation framework based on the JSR 303 Java validation specification. This framework allows you to validate your data before it's saved, and it can be customized at runtime to meet specific needs.
SAP Commerce simplifies the management of digital assets with tools for media conversion and organization, making it easier to handle various aspects of your digital content.
The Generic Data Report feature allows you to collect and display raw data from the SAP Commerce database in an understandable report format. For historical reports, the audit feature is available, providing a way to track data changes over time.
ImpEx is a text-based tool for importing and exporting data. It allows you to create, update, remove, and transfer data items like customer, product, or order information between CSV files and the platform.
SAP Commerce supports internationalization and localization, enabling you to customize the system for different languages and regional requirements, ensuring that your platform caters to a global audience.
JMS provides asynchronous communication, allowing for remote method invocation. It complements synchronous solutions like RMI and Web services, providing a more flexible communication approach.
SAP Commerce includes robust logging features that let you configure how logs are formatted, sorted by message type and level, and where they are reported, making it easier to track and manage application events.
In multitenant mode, SAP Commerce can run multiple logical instances on a single installation, each with its own distinct set of data. This is useful for hosting multiple online shops for different customers within one SAP Commerce system.
OAuth 2.0 is the default authorization framework used for the Omni Commerce Connect (OCC) Web Services, enabling secure and flexible authentication and authorization.
The platform provides built-in support for processing orders, managing payment methods, handling pricing, and organizing regions for shipping costs. It also offers services for managing orders efficiently.
SAP Commerce provides various tools for monitoring the performance of your application. These tools help you fine-tune your installation, ensuring that the system runs efficiently and effectively.
Polyglot persistence allows you to store certain types of data in alternative storage systems, like document-based storage. This helps reduce the load on the main database and supports non-SQL storage for specific data types.
SAP Commerce provides methods to filter database data based on primary keys, improving query performance and data management.
When customizing SAP Commerce, it's essential to set up a clear business model. The platform provides tools to help you design and implement your business models effectively.
The Product Content and Catalog features allow you to structure, manage, and organize products and product information, making it easier to manage your online store’s catalog.
SAP Commerce supports two built-in search mechanisms: FlexibleSearch and GenericSearch. You can also use ViewType, which represents a database view, to enhance search functionality.
SAP Commerce uses Charon to ensure secure HTTP transactions, protecting sensitive data during communication.
The platform includes tools for managing user access, data encryption, and security, allowing you to control who can access what data and ensuring your platform is secure.
The SAP Commerce ServiceLayer API allows you to develop and extend services for your system. It includes a number of common services and allows you to create custom services tailored to your needs.
ServiceLayer Direct enables you to directly read and write data in the database, bypassing the Jalo layer. This is useful when you need more direct control over your data management.
Platform workflow and collaboration tools make it easier to define and manage complex organizational processes. These tools help improve transparency and efficiency in your workflows.
Omnichannel Capabilities:
Pre-built Accelerators:
Product Content Management (PCM):
Order Management:
Personalization:
Integration with SAP Ecosystem:
Cloud Deployment:
Analytics and Reporting:
SAP Commerce, is built on a modular and extensible architecture that ensures flexibility, scalability,
and
seamless integration with SAP’s ecosystem. The platform supports tailored commerce experiences through its
multi-layered
structure, including the Platform, Modules and Extensions,
Accelerators, and a comprehensive
suite of administrative tools. This design empowers businesses
to efficiently manage complex commerce operations,
integrate with other systems, and adapt to evolving business
requirements.
The core of SAP Commerce is the Platform, which serves as the foundational module common to all configurations. It includes a variety of extensions that provide essential building blocks for higher-level modules. These building blocks include support for core functionalities like:
Additionally, many optional extensions can be added to enhance functionality and support both standard business modules and any custom features you may wish to develop.
Modularity and Extensibility
Seamless Integration
Customizable and Scalable Solutions
Business Agility:
Enhanced Customer Experience:
Future-Proof Design:
Extensions and addons are foundational concepts in SAP Commerce (Hybris). While both are used to deliver functionality, their purposes and use cases differ significantly. Here's a detailed comparison to clarify their distinctions:
core, storefront, cockpit, and various
platform-provided extensions.
addoninstall
command.
captchaaddon, asmaddon, and secureportaladdon.
| Aspect | Extension | Addon |
|---|---|---|
| Purpose | Used to create completely new or standalone functionality. | Used to enhance or add to existing functionality. |
| Scope | Provides business logic, integration, or core functionalities. | Adds modular, optional features (e.g., Captcha, Assisted Service Module). |
| Codebase Impact | Requires direct integration or calls within existing codebases. | Leaves existing code untouched; overlays functionality during the build process. |
| Reusability | Can be reused but often requires additional integration effort. | Highly reusable and easily pluggable into different projects. |
| Installation | No special installation; included during regular builds. | Requires running addoninstall to copy code into the target extension. |
| Removal | Requires manual removal of code references. | Simple to remove using addonuninstall. |
| Build Time | Generally faster, as no file copying is required. | Slower, as addon files are copied into target extensions during the build. |
| Examples | core, storefront, backoffice, integration extensions.
|
captchaaddon, secureportaladdon, commerceorgaddon. |
| Use Case | Choose Extension | Choose Addon |
|---|---|---|
| Developing new functionality | When building large or complex functionality from scratch. | Not suitable. |
| Enhancing storefront functionality | Not ideal. | When adding specific enhancements like Captcha or ASM. |
| Third-party system integration | Preferred for handling integrations with APIs or services. | Not suitable. |
| Reusability across projects | Possible but requires manual integration. | Best suited for reusable, pluggable modules. |
| Adding/removing functionality easily | Requires manual effort for both addition and removal. | Addons are highly modular and can be plugged/unplugged easily. |
addoninstall, copying files) during the
build process.
Modules provide the business logic, APIs, and presentation layers. Each module consists of several extensions that deliver different layers of a business function. For example, a subscription management module might include:
Other common extensions may include web service extensions, such as REST APIs, or AddOns, which allow you to add new functionality to a storefront without modifying core template files. Modules may also leverage business logic from other modules, which is handled by SAP Commerce's build management system during application construction.
Accelerators are pre-built, customizable storefront templates provided by SAP Commerce. These templates support both B2C and B2B business models, along with industry-specific solutions. You can also create a storefront using a decoupled JavaScript implementation, such as Spartacus, for more flexibility in front-end design.
SAP Commerce allows full customization and integration to meet your specific business requirements. You can integrate it with the SAP Business Technology Platform (BTP) to sync data with backend systems like SAP ERP or S/4HANA, or utilize services from the SAP BTP Extensions. Additionally, SAP Commerce allows you to extend or build new features from scratch, leveraging its platform and APIs to create unique, tailored experiences for your customers.
SAP Commerce provides a suite of tools for both system and business administration. System configurations can be managed using the Administration Console. For business management, the Backoffice Administration Cockpit and various specialized perspectives like the Product Management Cockpit and Adaptive Search allow for detailed control over users, roles, access permissions, and other business aspects.
The data model is base of application, it defines the structure of your application.
Business logic is always
based on top of the data model and helps an organize and maintain their database.
each extension has
extension-name-items.xml file.
ItemTypes are the base of the hybris. Item types are used to create new tables or to update existing tables.
The items.xml file in is used to define ItemTypes, which represent the business objects
.
These items are mapped to database tables. The items.xml file specifies attributes,
relations, and other metadata for
each type, helping to configure the data model for the application.
Data entities are defined with item type elements, whereas relations between items are defined with relation
elements.
Item.xml file is locate resource/ extension-name.items.xml file in each extension. which is used for
create data model
of business. you can define new types,override and extend existing types.
Type system is used for design data modeling or organize data. Types define an objects for manage and store
data
with Java implementation. For instance, Java have class and object. Class is blueprint of Object and Object is
instance
of Class. Same concept is follow. Hybris defines Type and Item. Type is blueprint of Item and Item
is
instance of type.
System Related Type : It extends type system itself and deal with manage internal data
Business Related Type: it is manage business activity data like Order, Customer, Product.
A CollectionType contains number of instances of types. It is based on the Java Collection class. you can use of
the
Collection
class and some of its sub-classes (List, Set, and SortedSet). There are two types of relations that you can
build
with CollectionTypes: one to many relations and many to one relations. Both kinds of relation are unidirectional.
Collection Types have technical limitations
If a collection contains a number of PKs, the field value may reach the maximum length of field for the database
and
collection entries may get truncated. you can only store values of a certain length in that database field
and every bit
of information beyond that length gets lost.
As the database entry only contains the PKs and not the items themselves, you cannot run database searches on the
entries
directly.
If a single CollectionType instance has several AtomicType entries that match a search query, you are not able to
detect
the exact number of matches from the database directly.
RelationTypes represent n:m relations. You can link a one item to other item. LinkItems hold two
attributes,
SourceItem and TargetItem, that hold references to the respective item. LinkItem is helper type item which
is
linked together of source and target item.
one-to-one, unidirectional : (attribute definition, such as Product instance - Unit instance)
one-to many,
unidirectional : CollectionType
many-to-one, unidirectional : CollectionType
many-to-many, bidirectional :
RelationType
When to use and when not use Collection/Relation?
There is no such hard and fast rule for choosing
Collection/Relation, we just need to consider few points before
choosing it.
When to Use Collection?
Prefer collection when we are sure that in our current and future requirements, we will
not have many rows mapped for
one side.
It means whenever the collection size is small,we can prefer
collection as it helps to achieve faster retrieval
When not to use Collection?
Don’t use collection whenever the collection size is very big as it can lead to data
truncation
When to use Relation?
Whenever the collection size is bigger or there is a chance that it can grow bigger then
prefer Relation as it assures
that there will be no data truncation.
For many to many , we should go for
Relation always.
When not to use Relation?
We can just prefer collection in place of Relation whenever the collection size is
smaller to compensate slow retrieval
of Relation but in that case we need to negotiate with Bidirectional
mapping.
So choose it based on the above factors which suits your requirements.
As we all know that any attribute we define in item type will have a tag called persistent type.
persistent type=”property”
Corresponding column will be created in the database and hence the values will be
stored in the DB. So it’s called
persistent attribute.
persistent type=”dynamic”
There will be no column created in the database and hence values will not be stored in
the database.
So it’s called Non persistent or dynamic attribute.
For every dynamic attribute we define, we need to mention the attribute handler otherwise Bean Id will be
generated
automatically and we have to use the same bean id while defining Spring bean in XML.
Attribute handler is implemented using Spring.
So we need to mention the spring bean id for the attribute handler.
Then we need to define the class for that
spring bean id which provides the custom logic for the dynamic attribute.
It is possible that one item type can
have any number of dynamic attributes.
Dynamic in enum is completely different from Dynamic attributes.
If an Enumtype is non-dynamic (by default,
dynamic=”false”) we are not allowed to add new values at runtime.
If we add any non-dynamic enumtype without
values,build will fail as it does not have any effect.
So if you want to add new values at runtime we have to
make dynamic=”true” for an enum.
We can change the flag anytime but enforces a system update.
If
dynamic=”false” the servicelayer generates real java enums (having a fixed set of values).
If dynamic=”true” it
generates hybris enums which can be used without fixed values(means we can add run time values).
code :The identifier of this ItemType
extends :The superclass of this ItemType
jaloclass: The fully qualified
classpath of this ItemType
autocreate : If set to true, this ItemType will be created when the platform creates
the type system during
initialization.
generate: If set to true, the platform creates getter and setter
methods for this ItemType.
qualifier: The identifier of this Attribute
redeclare: change its behaviour of an attribute
type: The
identifier of the type this attribute is going to be.
write : Setting modifier to true results in a setter
method being generated for this attribute and setting modifier to
false results in no setter method being
generated for this attribute:
read: Setting modifier to true results in a getter method being generated for this
attribute and setting the modifier to
false results in no getter method being generated for this attribute:
Hybris provide two ways for set the database column type :
By specifying the database column type in the item.xml file, such as
You can also define this in more detail by
specifying database systems
We need to decide one of the ways based on the requirement.
SAP Hybris provides a powerful data modeling framework that allows businesses to define complex relationships and associations between various data elements. The types of data used in SAP Hybris are fundamental for building a robust data model. This article explores key concepts, including the types of data, attributes, and relationships used in the platform.
The SAP Hybris data model consists of several different types of data, each representing a particular category or entity. These data types include Simple Types, Collection Types, and Relation Types, which are essential in defining the structure and relationships of items within the model.
Simple types represent basic data elements that do not have any further complexity. These types typically define attributes such as numbers, text, and dates. Simple types are often used for defining basic properties of an entity, such as a product’s name or a customer’s address.
Some examples of simple types include:
Collection types are used to store multiple instances of a given item type. They allow a data model to support relationships where an entity can have multiple associated items.
There are different types of collections in SAP Hybris, including:
Collection types are especially useful in cases where entities need to reference multiple related entities. For example, a product can have multiple images, and a customer can have multiple orders.
A relation type, also known as a relationship type or simply a relationship, defines the association or connection between two or more entities or data elements within a data model. Relationships play a crucial role in modeling the structure and interactions between different parts of a data model, helping to represent the complex relationships that exist in the real world.
Here are some key aspects and types of relationships in data modeling:
Cardinality: Cardinality describes the number of instances of one entity that can be related to the number of instances of another entity through a relationship. Common cardinality options include "one-to-one," "one-to-many," and "many-to-many."
Directionality: Relationships can be unidirectional or bidirectional. A unidirectional relationship means that one entity knows about the other, but the other doesn't necessarily have knowledge of the first entity. In a bidirectional relationship, both entities are aware of each other.
Here’s an explanation of how relationship types are defined in items.xml:
One-to-One Relationship: A one-to-one relationship can be created by simply defining an attribute of item type.
In this example, the "Employee" item type has a one-to-one relationship with the "IdentityCard" item type. An "Employee" item can have one associated "IdentityCard" item through the "identityCard" attribute.
Practical Use Case: Suppose you have an employee Steve with code "stev8848" who has one identity card with code "id299292". We can define this one-to-one relation as below:
One-to-Many Relationship: A one-to-many relationship between item types defines a relationship where one instance of the source item type can be associated with multiple instances of the target item type. This is known as a "one-to-N" relationship.
In the example, you have two item types: "Country" and "State." Each country can have one or more states, creating a one-to-many relationship.
Practical Use Case: Suppose you have a Country as USA and you want to associate multiple states (e.g., Florida, California, Arizona) with this Country. You can use this one-to-many relationship to link the "Country" item to all the relevant State items.
Many-to-Many Relationship: A many-to-many relationship between item types defines a relationship where multiple instances of one item type can be associated with multiple instances of another item type. This is known as a "N-to-N" relationship.
In this case, you have two item types: "Product" and "Category." Each product can belong to multiple categories, and each category can contain multiple products, creating a many-to-many relationship.
Practical Use Case: Suppose you have a "Clothing" category that contains multiple products, and you also have a "Sale" category that contains some of the same products. You can use this many-to-many relationship to associate these categories with the relevant products.
In Hybris, defining data types is a key task when designing the data model. This is typically done within the items.xml file, where different item types and their attributes are defined. Each data type, whether simple, collection, or relation, can be configured with various attributes that determine its behavior and structure.
For example:
String,
Integer, etc.
By defining these data types properly in the items.xml file, Hybris users can ensure that their system is capable of handling complex data models and relationships, enabling the platform to function smoothly and efficiently.
Here is the revised article without code, maintaining the original explanations and source definitions, but removing the code snippets as requested:
An "item type" is a fundamental concept used to define the structure and characteristics of different data entities or objects within the Hybris. Item types serve as the blueprint for creating, managing, and querying data in a Hybris system.
In an e-commerce system, common item types might include "Product," "Category," "Customer," "Order," and "Payment."
For content management, item types like "CMSComponent" and "CMSPages" can be used to model web page components and pages.
Custom item types can also be created to represent domain-specific data within the Hybris system.
There are mainly 4 ways of defining an item type in item.xml:
New Item Type Definition Without Extending Existing Item Type:
In this case, we are
creating an item type from scratch without extending any existing item type. This approach is used when a new
table needs to be created to store specific data.
Practical Use Case: For example, defining a table to store customer ID, feedback text, and the ratings given by a customer. This requires defining attributes for the customer feedback details, where the table is created and its persistence configuration is specified.
Attribute Data Types:
Attribute Modifiers:
New Item Type Definition by Extending Existing Item Type:
This approach involves creating
a new item type by extending an existing one. This allows new functionality to be added to an existing item
type.
Practical Use Case: For instance, adding a new attribute for a product to specify the list of country codes where the product is available. This defines a relationship between the product and the countries where it is visible.
Attribute Definition: A list of country codes is added to the new item type, specifying which countries each product is available in.
Define the New Attribute in the Existing Item Type:
In some cases, new attributes are
added to existing item types to introduce new functionality, such as adding a configurable flag to products.
Practical Use Case: A flag to indicate whether a product is configurable, allowing the business logic to filter configurable and non-configurable products accordingly.
Attribute Modifiers:
Boolean.FALSE for the configurable
flag.
Redeclaring the Existing Attribute in the Child Item:
In some scenarios, an existing
attribute needs to be redeclared in the child item type, usually to modify its properties like making it
read-only or changing its data type.
Practical Use Case: For example, redefining the "isocode" attribute in the Country
item type, which was originally defined in the parent C2LItem item type. Here, the attribute's
uniqueness constraint might be modified in the child item.
Attribute Modifiers:
concept called variable hiding which means variable with the same name is defined in both parent and child classes.
variable from Parent will be inherited but it will be hidden in the Child class as the Child class also has the
same
variable.
we can also change the variable data type in Child class keeping the same variable name.
To create a new extension in , follow these steps:
/bin/platform directory.ant extgen command: ant extgen -Dinput.template=yempty -Dinput.name=occ
-Dinput.package=com.epam.trainingyempty for an empty extension)./custom directory and is ready to be developed.This file contains the list of extensions that you are using for your commerce application. This file would be
responsible
to build all the extension for your application.
It enables developers to customize the platform’s functionality by selectively enabling or disabling
extensions,
controlling their loading order, and managing dependencies, all of which ensure the flexibility and
scalability
of the system.
The Model Life Cycle in SAP Hybris Commerce describes how a Model, which represents a database record (entity), transitions through various phases. These phases control how models are created, modified, saved, and deleted, while also providing hooks for custom logic via interceptors. The lifecycle ensures that models are managed efficiently, reflecting changes in the database only when explicitly saved, rather than automatically syncing data.
Instantiating the Model:
new keyword to
create a new instance.
ModelService: This provides a more
flexible way to create models, especially dynamically.
Example of creating an instance:
ProductModel product = new ProductModel();
or through ModelService:
ProductModel product = modelService.create(ProductModel.class);
Loading an Existing Model:
Models can be loaded from the database using different
mechanisms:
ModelService.get() method fetches a model
by its primary key.
ProductModel product = modelService.get(pk);
Modifying Model Values:
Once a model is instantiated, its properties can be modified
using standard getter/setter methods.
product.setCatalogVersion(catalogVersion);
product.setCode(code);
Saving Model Values:
After making modifications, models must be explicitly saved to
persist changes to the database. The ModelService.save() method is used for this.
modelService.save(product);
modelService.saveAll();
When saving, any referenced models (models referenced by other models) are also saved automatically if they are new or modified.
Removing the Model:
To delete a model from the database, use the remove()
method of ModelService.
modelService.remove(product);
Refreshing the Model:
To refresh a model's state from the database, the refresh()
method is used, which will discard unsaved changes.
modelService.refresh(product);
Lazy loading ensures that model properties are not loaded from the database until they are explicitly accessed. The model is instantiated with empty or default values, and the actual data is fetched from the database only when required. This reduces the initial overhead of loading unnecessary data.
The loading behavior can be controlled via the servicelayer.prefetch property:
literal: Pre-fetch only atomic attributes, not reference attributes.all: Pre-fetch all attributes, including references.CategoryModel
references a ProductModel, the product will only be saved if it is new or modified when saving the
category.
Hybris uses two different layers of data representation:
You can convert between these layers:
Product productItem = modelService.getSource(productModel);
CartModel cartModel = modelService.get(cartItem);
ModelService provides methods to create models dynamically,
attach them to the context, and apply default values.
This lifecycle ensures that the models are efficiently managed, changes are tracked, and database persistence is optimized in the Hybris Commerce platform.
Impex files are used for importing and exporting data to and from the system. The Impex header defines the structure and metadata for the import data, specifying how the data should be handled, which attributes are involved, and additional settings for the import process.
default keyword is used to specify default values for attributes that are not provided during
an import. This keyword can be used for attributes that should have a fixed value if not otherwise specified in
the import data.
INSERT_UPDATE Product; code[unique=true]; name[lang=en]; price[default=0.0]
In this example, if the price attribute is not provided in the import data, the system will assign a default value of
0.0.
unique keyword indicates that the attribute must have a unique value. This ensures that no
duplicate values are allowed for the specified attribute. Typically, this is used for identifiers like product
codes, category codes, etc.
INSERT_UPDATE Product; code[unique=true]; name[lang=en]
Here, the code attribute must have a unique value for each product. The unique=true setting
enforces uniqueness on the code field.
mode keyword controls how the Impex data is processed. It determines whether the Impex file
will insert, update, or both (insert or update) data in the Hybris system. The typical modes are:
INSERT_UPDATE Product; code[unique=true]; name[lang=en]; price
In this case, the mode INSERT_UPDATE means that if a product with the specified code
exists, it will be updated; otherwise, a new product will be inserted.
INSERT_UPDATE Product; code[unique=true]; name[lang=en]; description[lang=en]
Here, the name and description attributes are specific to the English language (lang=en).
collection keyword is used to define a list or collection of items. It is often used for
attributes that refer to related items, such as products in a category.
INSERT_UPDATE Category; code[unique=true]; products(code)[collection=true]
Here, products(code) indicates that the products attribute is a collection, and multiple
product codes can be provided.
optional keyword specifies that a given attribute is optional, meaning that the import will
proceed even if the attribute is not provided in the Impex data.
INSERT_UPDATE Product; code[unique=true]; name[lang=en]; description[optional=true]
In this case, the description attribute is optional, so it is not required to be included in the import
data.
| Keyword | Description |
|---|---|
| default | Defines default values for attributes that are not provided in the import. |
| unique | Enforces uniqueness on the attribute value. |
| mode | Defines the operation mode: insert, update, insert_update, or delete.
|
| lang | Specifies language-specific values for localized attributes. |
| collection | Indicates a collection or list of related items. |
| optional | Marks an attribute as optional, meaning it can be left out. |
These keywords help define the structure, behavior, and rules for importing and managing data within Hybris.
Business processes are workflows that define the operations and transactions that occur within an e-commerce environment. These processes are essential for automating tasks, streamlining operations, and ensuring efficient execution of business logic. The processes run asynchronously, meaning actions are executed independently, enabling a smooth flow of operations without blocking other tasks. Business processes are defined through XML files, where each process consists of nodes (actions, decisions, events, etc.) that guide the workflow from one step to another.
This structure ensures that the business process executes the defined workflow reliably and asynchronously, with each step being handled appropriately based on the system state and external interactions.
Business Process Engine:
The Business Process Engine allows for the
asynchronous execution of business processes, which are defined in XML. The engine ensures that each action in
the process is completed before transitioning to the next. A transition is the link between two actions, guiding
the workflow based on the outcome of a previous action. The process engine persists the state of the process,
meaning that even if a system crash occurs, the process will resume from its last known state after recovery.
Process Definition:
A process definition specifies the sequence of steps
(nodes) that make up the workflow. Each node represents a step in the process, and actions within those nodes
determine the next step. The nodes include action nodes, wait nodes, notify nodes, and end nodes. Transitions
between nodes dictate how the process progresses based on the outcomes (e.g., success or failure).
Action Nodes:
Action nodes are critical as they execute the business logic. Each action
is linked to a bean that performs a specific function, and the outcome of this action determines the next step
in the process. If the action succeeds, the process moves to one node, and if it fails, it moves to another.
Wait Nodes:
Wait nodes are used when the process needs to wait for external events or
systems to complete a task before continuing. These events might be tied to external systems or processes that
trigger the next step in the workflow.
Notify Nodes:
Notify nodes are used to send notifications to user groups or specific
users at certain points in the process, updating them on the status or actions required.
End Nodes:
End nodes mark the completion of a business process. These nodes store the
final state of the process (e.g., success, error) and typically define messages like "Process completed
successfully" or "Process failed."
Consider a simple process where, after an order is placed, email notifications are sent to the customer and the business partners. This example could involve the following sequence of steps:
Asynchronous Execution: By default, Hybris executes business process actions asynchronously, allowing each action to run independently without blocking others. This ensures a responsive system where processes can operate concurrently.
Synchronous Execution: In some cases, actions must be run synchronously, i.e., one after
another within the same task. This can be explicitly configured by modifying properties in the local.properties
file to ensure actions in a business process do not proceed until the current action completes.
placeOrderNotificationProcess.xml, which specifies the sequence of actions, transitions, and end
states.
spring.xml),
linking the defined XML process to the system.
BusinessProcessService
to create and start the process instance when an order is placed.
Business processes are a series of steps or activities that repeat over time. Business process management in SAP Commerce helps identify, define, document, control, and optimize these processes, integrating both automated and human-driven activities.
Caching is essential for enhancing the performance and scalability of a system by storing frequently accessed data and minimizing the need to repeatedly fetch it from databases or other external sources. In Hybris, caching is integrated within the persistence layer and is responsible for storing search results, item attributes, and item instances. When a query is made, the cache checks if the data is available; if not, the data is retrieved from the database and written to the cache for future use.
When the cache reaches its maximum capacity and can no longer accommodate new entries, a displacement strategy is employed to remove older data. Additionally, when the data in the cache becomes outdated and no longer matches the database, an invalidation strategy is used to invalidate and refresh the cache.
Item Cache:
The item cache stores model objects or items retrieved from the database. It
reduces the load on the database by caching items that are accessed frequently. The configuration for item
caching is generally specified in the project.properties or local.properties file.
Attribute Cache:
This cache stores frequently accessed attributes of items, eliminating
the need to reload the entire item from the database. It can be configured at the attribute level, allowing
specific attributes to be cached individually.
Region Cache:
The region cache divides the cache into multiple segments, referred to as
cache regions. Each region can hold specific types of data, offering the flexibility to cache certain data for
longer durations while expiring other data more quickly. This segmentation allows for better management of cache
resources, optimizing performance.
CMS Site Cache:
This cache stores site-specific data that improves the performance of
content management functionality in Hybris.
The region cache provides flexibility by partitioning the cache into multiple regions, each dedicated to specific data types. This configuration ensures that some objects remain in the cache longer, while others may be evicted sooner due to limited cache space.
Regions can be configured separately to manage different types of data and control cache sizes and eviction strategies.
Least Recently Used (LRU):
LRU evicts the least recently used entries first when the
cache needs to make space for new data. This is a common and straightforward eviction policy.
Least Frequently Used (LFU):
LFU evicts the least frequently accessed entries first. It
prioritizes retaining the entries that are accessed most often.
First-In-First-Out (FIFO):
FIFO evicts the oldest entries first based on the order in
which they were added to the cache.
You can modify the region cache settings by updating values in the local.properties file, which allows
you to adjust preconfigured values and override defaults.
For example, you can configure the size of the entity region or specify the eviction policy to be used, such as LRU or FIFO.
Hybris also allows you to implement custom cache regions using different caching implementations, such as Ehcache. You can define a new region cache with specific settings, including maximum entries, eviction policies, and the types of data to be cached.
A custom cache region can be configured using the Spring configuration framework, specifying parameters like the region name, maximum entries, eviction policy, and the data types handled by the region.
A catalog serves as a structured repository for product and content data, enabling the organization and presentation of e-commerce items and associated content in a cohesive manner. Catalogs are vital for managing product listings, pricing, promotions, and other related data, enhancing the overall user experience on the platform. They help businesses organize products into categories and offer content that can be managed to create targeted marketing and customer engagement strategies. Effective catalog management withensures that the content is up-to-date and that product data is consistent across different channels.
Hybris supports two primary types of catalogs:
Content Catalog: A content catalog helps businesses manage and organize content such as images, videos, banners, and other media for the e-commerce platform. It allows businesses to create rich, dynamic content experiences for customers, facilitating engagement and driving conversions.
Product Catalog: The product catalog is used for managing the data related to the products sold on the e-commerce site. It includes information like product attributes (name, description, price, images) and categorizes products into predefined groups, making it easier to structure and find products. A single Hybris installation can support multiple catalogs and catalog versions.
Catalog versions enable the management of changes to products and content data over time. They allow businesses to make adjustments in a controlled manner and ensure the integrity of product listings. Two main types of catalog versions are typically used:
Staged Catalog Version: The "Staged" catalog version is used for making changes and testing modifications in a sandbox environment. Changes here are not immediately visible to customers. It acts as a preview or validation space where product data, pricing, and content updates can be thoroughly tested and reviewed before going live.
Online Catalog Version: The "Online" catalog version is the live version that customers interact with. It reflects the current state of the product catalog and is directly visible on the e-commerce site. Any updates made in the online version are immediately accessible to customers, ensuring they see the most current product data, availability, and pricing.
Catalog synchronization is the process of transferring updates made in the "Staged" catalog version to the "Online" catalog version. This ensures that the live store reflects the latest validated product and content data. Synchronization is crucial for maintaining the accuracy and consistency of product listings in real-time.
Before synchronization, it’s essential that the staged catalog has undergone thorough testing and review to ensure no issues arise when the changes are applied to the online store.
Delta synchronization refers to synchronizing only the items that have been changed (added, updated, or deleted) in the source catalog version since the last synchronization. This approach improves performance by avoiding the synchronization of unchanged items.
Delta synchronization is a powerful optimization technique that focuses on syncing only the changed (delta) items based on timestamps. This mechanism is essential for efficient catalog management, especially in environments with large and frequently updated catalogs. By leveraging timestamps and sync jobs, delta synchronization ensures performance and data consistency between staged and online catalog versions.
Change Tracking Mechanism
modifiedTimestamp field that
indicates when it was last changed.
syncTimestamp)
for each synchronized item in the source and target catalog versions.
modifiedTimestamp of an item in the staged version is newer than its syncTimestamp
in the online version, the item is flagged for synchronization.
Delta Computation During Sync
modifiedTimestamp of each item in the source catalog.syncTimestamp of the corresponding item in the target catalog.Database Query Optimization
modifiedTimestamp > syncTimestamp are included in the
synchronization queue.
Partial Synchronization
modifiedTimestamp <= syncTimestamp) are skipped.Delta synchronization can be triggered under the following conditions:
Synchronization in catalog versions is needed to keep the staged and online catalog versions consistent, ensuring that changes made in the staged catalog are properly reflected in the online catalog. Hybris determines the need for synchronization based on certain criteria, configurations, and states of the catalog items. Here's how Hybris identifies when synchronization is required:
ItemSyncTimestamp).
sync attribute.Hybris determines the need for synchronization based on:
Properly configured synchronization jobs and workflows ensure consistency between catalog versions while minimizing unnecessary sync operations.
Impex is a powerful import/export tool, designed primarily for inserting, updating, or
deleting data in
the database from flat files (such as CSV). It allows batch operations for managing data within
the Hybris system. It
can be used for importing product data, updating catalog information, or managing complex
configurations like user
groups and permissions.
PageTemplateModel:
INSERT_UPDATE PageTemplate; code[unique = true]; name[lang = en]; catalogVersion(catalog(id), version)[unique = true]
; myPageTemplate; "My Page Template" ; {catalogVersion}
items.xml).catalogVersion).
FlexibleSearch is a query language used to retrieve data from the database in a more
dynamic way. It is an
abstraction layer over SQL, making it easier to write database queries while remaining
database-agnostic. FlexibleSearch
automatically adapts to the underlying database system (e.g., MySQL, SAP HANA)
and allows you to execute queries using
the Hybris FlexibleSearch API.
SELECT * FROM {Order}
date is not null:
SELECT * FROM {Order} WHERE {date} IS NOT NULL
| Feature | Impex | FlexibleSearch |
|---|---|---|
| Purpose | Data import/export, batch data manipulation. | Data retrieval from the database. |
| Used for importing, inserting, and updating data in the database. | Used for querying and retrieving data from the database. | |
| Use Case | Batch operations for managing data (e.g., product data, user groups). | Querying specific data from Hybris items. |
| Used for inserting, updating, and deleting large sets of data (products, categories, etc.). | Used for querying data from the database for reports, filtering, and searching. | |
| Data Handling | Works primarily with CSV-like data in flat files. | Works with Hybris database and model objects. |
| Query Type | No querying; it’s based on predefined actions like INSERT, UPDATE,
REMOVE.
|
Supports complex queries with filters, joins, and sorting. |
| Read/Write | Both read and write (can insert, update, or delete data). | Read-only (used for data retrieval). |
| Performance | Optimized for batch processing and large imports/exports. | Optimized for querying and retrieving data in real-time. |
| Context Support | Supports dynamic data population using context-based values. | Allows querying of data objects and relations. |
| Flexibility | Limited flexibility, as it is mainly for predefined operations on datasets. | Highly flexible in terms of querying and data retrieval. |
| Language | Flat-file format with specific syntax. | SQL-like query language with object-oriented syntax. |
| Syntax | Declarative syntax with INSERT_UPDATE. |
SQL-like syntax with a focus on object-oriented queries. |
| Flexibility | Primarily used for data imports and updates; not used for dynamic querying. | More flexible in querying with dynamic parameters and complex conditions. |
| Modification | Used to insert or update records in the database. | Does not modify data, only fetches it. |
| Database Support | Database-independent, but based on predefined item types. | Database-agnostic, adapts to various underlying databases. |
| Output | Affects the database by inserting or updating records. | Returns results in a SearchResult object (list of models). |
| Example Use | Importing new products, updating user group configurations. | Fetching orders based on their status or products based on a category. |
FlexibleSearch supports parameters, making it more dynamic and adaptable for real-time queries.
Example:
private static final String GET_ORDERS = "SELECT {PK} FROM {Order} WHERE {status}=?status";
FlexibleSearchQuery query = new FlexibleSearchQuery(GET_ORDERS);
query.

addQueryParameter("status",OrderStatus.COMPLETED);

SearchResult<OrderModel> result = flexibleSearchService.search(query);
List<OrderModel> orders = result.getResult();
This example demonstrates how a parameterized query is used to dynamically fetch orders that are completed.
Impex should be used when:
FlexibleSearch should be used when:
Hybris supports importing data via CSV (Comma-Separated Values) format, but with certain specific rules and
configurations.
Here's how to use the ImpEx CSV format.
code[unique=true];name[lang=en];catalogVersion(catalog(id),version);price
product001;Product 1;{electronicsCatalog:online};100.00
product002;Product 2;{electronicsCatalog:online};200.00
Here, each column in the CSV represents an attribute of the Product item type:
# This Impex script imports or updates products.
INSERT_UPDATE Product; code[unique = true]; name[lang = en]             ; catalogVersion(catalog(id), version); price
product001           ; Product 1          ; {electronicsCatalog:online} ; 100.00
product002           ; Product 2          ; {electronicsCatalog:online} ; 200.00
INSERT_UPDATE: Ensures that if the product exists, it will be updated; if not, it will be inserted.
catalogVersion(catalog(id), version): References the catalog and version.You can access Groovy scripting in ImpEx to add logic or retrieve external data. The
Groovy code can be used to
enhance or manipulate the import data dynamically.
# Define variables for dynamic logic
$catalogVersion = {electronicsCatalog:online}
$price = 150.00

# Groovy Script to create product and set attributes
"#% import de.hybris.platform.servicelayer.search.FlexibleSearchQuery;"
"#% def catalogVersion = catalogVersionService.getCatalogVersion('electronicsCatalog', 'online');"
"#% def price = 150.00;"

# Use the Groovy variable in Impex
INSERT_UPDATE Product; code[unique = true]; name[lang = en]   ; catalogVersion(catalog(id), version); price
product003           ; Product 3          ; {$catalogVersion} ; {$price}
Groovy logic runs before the Impex lines are executed. It dynamically determines catalog
versions or computesYou can include conditional logic and variables in your Impex scripts to make them more flexible.
You can conditionally insert or update data based on the value of a variable:
$var = "true"
#% if: "$var.equals('true')"
INSERT_UPDATE Product; code[unique = true]; name[lang = en]             ; catalogVersion(catalog(id), version); price
product004           ; Product 4          ; {electronicsCatalog:online} ; 250.00
#% endif;
$var equals "true".Macros can be created to define reusable data or behavior.
$item = "Product"
INSERT_UPDATE $item; code[unique = true]; name[lang = en]             ; catalogVersion(catalog(id), version); price
product005         ; Product 5          ; {electronicsCatalog:online} ; 300.00
$item is a macro, and its value can be reused across the script.You can import data from external files or SQL databases directly into Hybris via ImpEx.
# Importing external data from a file
#% impex.includeExternalData("external_data.csv", "UTF-8", 0);

INSERT_UPDATE Product; code[unique = true]; name[lang = en]; price
#% impex.includeExternalData("external_data.csv", "UTF-8", 0);
impex.includeExternalData allows importing data from an external CSV into your system.You can also import data directly from an SQL database using impex.includeSQLData.
#% impex.initDatabase("jdbc:mysql://localhost/testdb?user=testuser&password=testpass", "com.mysql.jdbc.Driver");
impex.includeSQLData("SELECT code, name FROM Products");
To remove data from a specific item type (e.g., Product), use the
REMOVE operation.
$item = Product
REMOVE $item[batchmode = true]; code[unique = true];
$product
Hybris supports maps and collections within ImpEx. For example, for a product with multiple categories:
INSERT_UPDATE Product; code[unique = true]; categories(code)
product007           ; Electronics|HomeAppliances
Here, categories(code) is a map relationship where multiple values can be inserted in one go.
You can set validation modes to relaxed or strict depending on how
the imports should handle missing or
inconsistent data.
#% impex.setValidationMode("import_relaxed");

INSERT_UPDATE Product; code[unique = true]; name[lang = en]             ; catalogVersion(catalog(id), version); price
product008           ; Product 8          ; {electronicsCatalog:online} ; 150.00
import_relaxed allows ignoring mandatory field validation errors, while import_strict
will enforce them.
Creating item types is a flexible process that allows for customization and extension of the platform's
data
models. You can create new item types from scratch, extend existing ones, or modify them with new
attributes, depending
on the requirements of your project. Each method ensures that the corresponding database
structure and Java classes are
correctly generated and managed by the system.
Creating new item types is a critical part of managing data models for business applications. Item types
are
akin to database tables and their attributes represent the columns of those tables. Item types can be defined in
three
primary ways: as new standalone types, by extending existing types, or by modifying existing types with new
attributes.
Each method comes with specific configurations, such as generating Java classes, creating database tables,
and
managing attribute persistence.
To create a new Item Type, you must define the item type in the items.xml
file within your extension.
There are three main approaches:
In this method, you define a completely new item type without inheriting from any existing ones, such as GenericItem.
Example:
<itemtype code="DeliveryArea"
          autocreate="true"
          generate="true"
          jaloclass="com.custom.core.jalo.DeliveryArea">
    <description>The delivery area for an order</description>
    <deployment table="deliveryArea" typecode="10502"/>
    <attributes>
        <attribute qualifier="code" type="java.lang.String">
            <description>Area code</description>
            <modifiers optional="false" unique="true" initial="true"/>
            <persistence type="property"/>
        </attribute>
        <attribute qualifier="name" type="localized:java.lang.String">
            <description>Area name</description>
            <modifiers optional="false"/>
            <persistence type="property"/>
        </attribute>
    </attributes>
</itemtype>
You can extend an existing item type (e.g., Product), inheriting its attributes and functionality, and
then add custom
attributes or logic.
Example:
<itemtype generate="true"
          code="MyProduct"
          jaloclass="com.hybris.backoffice.jalo.MyProduct"
          extends="Product"
          autocreate="true">
    <attributes>
        <attribute qualifier="myExampleField" type="java.lang.String">
            <description>My Example Initial String Value</description>
            <modifiers/>
            <persistence type="property"/>
        </attribute>
    </attributes>
</itemtype>
MyProduct is an extension of the
existing Product type, inheriting itsInstead of defining an entirely new type, you can add new attributes to an existing item type, without modifying
its
structure. This is particularly useful when extending existing functionalities.
Example:
<itemtype code="Cart" generate="false" autocreate="false">
    <attributes>
        <attribute qualifier="subscription" type="Subscription">
            <persistence type="property"/>
            <modifiers/>
        </attribute>
    </attributes>
</itemtype>
unique, optional, etc.
persistence
        type="property"
) orConfiguring a CronJob involves creating the CronJob model, implementing the job logic in a
JobPerformable
class, and linking everything through Spring beans and Cron expressions. The CronJob system is useful for running
periodic tasks in the background, such as synchronization, cleaning, and data processing. Once set up, you can
schedule the execution of the job and manage its lifecycle through the HMC or Backoffice.
a CronJob is used to automate and schedule background tasks, such as catalog synchronization, data indexing, and cart cleaning. It consists of three main components: CronJob, Job, and Trigger. The Job defines the logic, the CronJob holds configurations like inputs for the job, and the Trigger schedules the job execution based on Cron expressions. This guide covers how to configure a new CronJob by defining the necessary components and setting up a job for scheduled execution.
creating a new CronJob involves defining and configuring several components: CronJob model, Job (performable), and Trigger. Here’s a step-by-step guide to configure a new CronJob:
The CronJob holds the configurations for the job, such as inputs, and represents a single run of the
job. You can create a new CronJob model by extending the CronJob item type.
Example:
<itemtype code="HelloWorldCronJob" extends="CronJob" jaloclass="com.stackextend.training.core.jalo.HelloWorldCronJob">
    <attributes>
        <attribute qualifier="firstName" type="java.lang.String">
            <modifiers/>
            <persistence type="property"/>
        </attribute>
    </attributes>
</itemtype>
The Job contains the business logic to be executed., you generally create a
JobPerformable
class to implement the business logic. The class should extend AbstractJobPerformable and implement the
perform method.
Example:
public class HelloWorldJob extends AbstractJobPerformable<HelloWorldCronJobModel> {

    @Override
    public PerformResult perform(HelloWorldCronJobModel cronJobModel) {
        try {
            // Retrieve firstName from the cronJob model
            String firstName = cronJobModel.getFirstName();
            // Display the greeting
            System.out.println("Hello " + firstName);

            // Return success status
            return new PerformResult(CronJobResult.SUCCESS, CronJobStatus.FINISHED);
        } catch (Exception e) {
            // Return error status if an exception occurs
            return new PerformResult(CronJobResult.ERROR, CronJobStatus.ABORTED);
        }
    }
}
Once the JobPerformable is implemented, register the class as a Spring bean.
Spring Bean Definition Example:
<bean id="helloWorldJob" class="com.stackextend.training.core.job.HelloWorldJob" parent="abstractJobPerformable">
    <!-- Other bean configurations if needed -->
</bean>
helloWorldJob) will be used in the next step.Create an instance of the ServicelayerJob and associate it with the Spring bean defined in the previous
step.
Example:
INSERT_UPDATE ServicelayerJob; code[unique=true]; springId
                            ; helloWorldJob    ; helloWorldJob
ServicelayerJob with the helloWorldJob bean in the Spring
context.
Once the CronJob model and job are set up, create an instance of the CronJob, linking it to the job and providing any necessary input parameters.
Example:
INSERT_UPDATE HelloWorldCronJob; code[unique=true]; job(code); firstName; sessionLanguage(isocode); sessionCurrency(isocode)
                               ; helloWorldCronJob; helloWorldJob; Mouad; en; EUR
The Trigger defines when the CronJob should be executed, using a Cron expression. You can define a trigger to schedule the CronJob at a specific time or interval.
Example:
INSERT_UPDATE Trigger; cronjob(code)[unique=true]; cronExpression
                     ; helloWorldCronJob     ; 0 0 12 ? * SUN *
After configuring the CronJob, you can run it manually through the HMC or Backoffice, or it will execute automatically based on the Trigger configuration.
Internationalization is essential for delivering localized content to users across different languages, currencies, and countries. Through the use of localized attributes, types, and content management interfaces in Backoffice and Storefront, Hybris supports a seamless multilingual experience. Additionally, support for multi-currency, multi-country configurations, and a fallback mechanism ensures the platform can scale to meet diverse regional requirements. Properly configuring these components guarantees an optimal user experience for global audiences.
Internationalization (i18n) enables applications to support multiple languages, currencies, and regions, ensuring that content is presented according to a user's locale. Hybris offers built-in support for managing translations of various elements like product descriptions, categories, and static content. To achieve this, it provides mechanisms such as localized attributes, localized types, and multi-language support through configuration. This guide outlines how to configure and implement internationalization in a Hybris-based system.
Hybris provides a comprehensive internationalization (i18n) framework that allows you to manage multiple languages, currencies, and country-specific content. Here's how you can handle i18n effectively within a Hybris system.
Hybris allows you to configure multiple languages for your storefront and backoffice. These languages are tied to the system's locale.
Add Languages: In the hybris/config folder, add languages in the locales.properties
file.
Example:
supported.languages=en, de, fr, es
This configuration will allow the system to support English, German, French, and Spanish.
Language Management: You can manage languages via the Hybris Administration Console
(HAC) by navigating to the Internationalization section where you can add and configure
new languages.
Localized attributes allow you to store different values of an attribute for each language. For example, a product's description might be different in English and French.
Localized Attribute Configuration: In the item type definition, you use the
localized keyword to define which attributes should support multiple languages.
Example:
<attribute qualifier="description" type="localized:java.lang.String">
    <modifiers optional="false"/>
    <persistence type="property"/>
</attribute>
localized prefix indicates that the attribute will have different values for each
supported language.
Accessing Localized Data: Hybris provides mechanisms to retrieve localized content through
the use of LocalizedValue objects. You can access localized values programmatically using the
getDescription() method, which returns the description in the current language.
Hybris supports Localized Types that are extended from the LocalizedType class. This is
useful when you need to define multiple variants of an item based on the language.
Example: If you have a product with localized attributes, the product type should extend
LocalizedType.
Example:
<itemtype code="Product" extends="Product">
    <attributes>
        <attribute qualifier="localizedDescription" type="localized:java.lang.String">
            <modifiers optional="false"/>
            <persistence type="property"/>
        </attribute>
    </attributes>
</itemtype>
When a user accesses the product, the appropriate localized description will be returned based on their preferred language.
To manage localized content effectively, Hybris provides user interfaces in the Backoffice and HMC that allow content managers to provide different translations for content such as product descriptions, category names, and banners.
Backoffice: Users can select the language for each field in the product, category, or content page. For example, the "Description" field will allow entries for each supported language.
Storefront: The storefront will automatically display content in the language associated with the user’s locale. The content management system handles the different translations.
Hybris provides multi-currency and multi-country configurations to manage country-specific content such as pricing, shipping methods, and promotions.
Currency Management: You can configure different currencies in the system through HAC or Backoffice. This includes defining exchange rates, supported currencies, and mapping them to specific locales.
Country-Specific Content: In the HAC or Backoffice, you can configure country-specific content, including product catalogs and promotions, to ensure they meet the specific requirements of each country.
When a translation for a given language is unavailable, Hybris uses a fallback mechanism. By default, if the content in the requested language is missing, the system will display the content in the fallback language (usually English). You can configure fallback languages to ensure a seamless user experience even when content is not available in the preferred language.
LocalizedValue Class for Programmatic Accessthe LocalizedValue class is used to store localized values for attributes. This allows
content to be managed in multiple languages.
public String getLocalizedDescription(Product product, Language language) {
    LocalizedValue localizedValue = product.getDescription();
    return localizedValue.get(language.getIsocode());
}
For translating content, the FlexibleSearch queries can be used to export content for translation purposes. Additionally, Hybris offers SAP Translation Hub integration, which allows easier management and automated translation of content across various languages.
For dynamic content (such as user-generated content), Hybris provides ways to handle multi-language support programmatically by customizing controllers and views to ensure content is presented in the user's preferred language.
Hybris also provides functionality to support SEO and URL localization, so URLs can be adapted based on language and
country. For example, the product detail page might be accessible via /en/product/123 for English users
and /de/produkt/123 for German users.
promotions are powerful but require custom implementation or strategic configuration to handle advanced use cases effectively. Understanding OOTB limitations and proactively addressing them with tailored logic ensures seamless promotion functionality while enhancing the customer experience.
robust support for promotions, but certain mechanics, such as "Buy One Get One Free" (BOGOF), multi-category promotions, and customer-specific discounts, reveal limitations in the Out-of-the-Box (OOTB) implementation. While basic configurations are possible, edge cases and more advanced requirements, like group-specific pricing or flexible free item handling, often require custom logic. Additionally, nuances such as order-of-operations issues in delivery discounts and complications with grouping strategies can impact expected functionality. This detailed overview identifies these gaps and offers insights into best practices for implementation.
Two Implementation Options:
Custom Workarounds:
Custom Actions and Conditions:
Optimize Configuration for Prioritization:
Leverage External Systems:
Analyze Business Needs:
's Promotion Engine, coupled with its modular design, delivers a powerful framework for creating tailored, impactful promotions. Its support for customizations ensures it can meet both standard and complex promotional needs, enabling businesses to enhance customer satisfaction and drive sales effectively.
Promotions leverage a robust Promotion Engine to implement various marketing strategies, from basic discounts to complex custom rules. The Promotion Engine includes essential modules like the Rule Engine, Coupon Module, and Timed Access Promotion Engine Module. Its implementation sequence integrates seamlessly with cart updates, recalculations, and rule evaluations while allowing advanced customization through custom conditions, actions, and facts. Custom promotions like rewarding reviews with group-based discounts showcase the engine's adaptability for unique business requirements.
Sequence of Operations:
Cart Update Trigger: Promotions are reevaluated whenever the cart changes (e.g., adding/removing products).
Promotion Evaluation: The system:
Rule Execution: The Drools Rule Engine evaluates rules and applies actions, such as:
Action Persistence: RAOs representing actions (discounts, messages, etc.) are processed using strategies:
Final Recalculation: Cart recalculations incorporate promotion results into the final order.
Custom promotions extend the flexibility of the Promotion Engine for scenarios not covered out of the box.
Extension Creation:
custompromotionengine extension for custom rules.Define New RAOs:
Custom Conditions and Actions:
Strategy Implementation:
Testing and Deployment:
Scenario: Customers writing product reviews gain access to a unique promotion.
Custom Promotion:
reviewedProductsCustomerGroup).Out-of-the-Box Promotion:
reviewedProductsCustomerGroup.This highlights Hybris's ability to blend standard and custom rules for tailored customer incentives.
Purpose it separating business logic from persistence logic, ensuring that the core functionalities of the platform are modular, extensible, and maintainable. It adheres to service-oriented architecture principles and provides a clean framework for developing and extending services. By focusing on business logic, the ServiceLayer allows developers to interact with the platform's models and manage system events efficiently. It offers hooks into lifecycle events, enabling custom business rules and event handling.
The ServiceLayer is an integral part of the architecture, sitting on top of the persistence layer and responsible for encapsulating business logic. It serves as the bridge between the persistence layer (which interacts with the database) and the client components (such as controllers, scripts, and services). The primary function of the ServiceLayer is to provide services that execute business rules while maintaining separation from the data access and storage logic.
Service-Oriented Architecture (SOA):
The ServiceLayer is based on service-oriented
architecture, which promotes loose coupling, modularity, and flexibility. This architecture ensures
that business logic can be encapsulated within independent services that can be easily extended or replaced
without affecting the core system.
Separation of Business and Persistence Logic:
One of the key principles of the
ServiceLayer is the clear separation between business logic and persistence logic. The services
handle only the functional aspects of the application, while the data access logic is handled separately by
repositories or DAOs (Data Access Objects). This ensures that the system is maintainable, testable, and easier
to extend.
Well-Defined Responsibilities:
Each service in the ServiceLayer is responsible for a
specific piece of functionality, whether it’s handling user management, order processing, or product catalog
management. This clear responsibility division makes it easier for developers to extend and
maintain the codebase.
Extensibility:
The ServiceLayer provides an architecture that supports both custom
service development and the extension of existing services. Custom services can be developed by
following the same patterns as existing services, ensuring consistency across the platform.
Based on the Spring Framework:
The ServiceLayer is built on the Spring
Framework, utilizing Spring’s features like dependency injection and transaction
management. Spring’s powerful dependency injection ensures that services are loosely coupled and that
dependencies can be injected into the services dynamically.
Common Design Patterns:
The ServiceLayer leverages design patterns like interface-oriented
design and dependency injection to ensure scalability and modularity. Services are
typically implemented through interfaces, which decouple the service’s interface from its implementation,
facilitating better maintainability and testability.
Lifecycle Hooks:
The ServiceLayer provides hooks into model lifecycle
events and system lifecycle events. For instance, it allows for custom logic to be
executed when a model is created, updated, or deleted, as well as during the initialization of the system or
when specific updates occur. This ensures that business logic can be executed automatically in response to
changes in the system.
Event Publishing and Subscription:
The ServiceLayer provides a framework for publishing
and receiving events. Events can be published when specific actions or changes occur in the system, such as when
an order is placed, a product is updated, or a promotion is applied. These events can trigger external services
or processes, such as notifications or further business logic.
The ServiceLayer is built using a combination of different architectural concepts. Some of these concepts are optional, while others are mandatory.
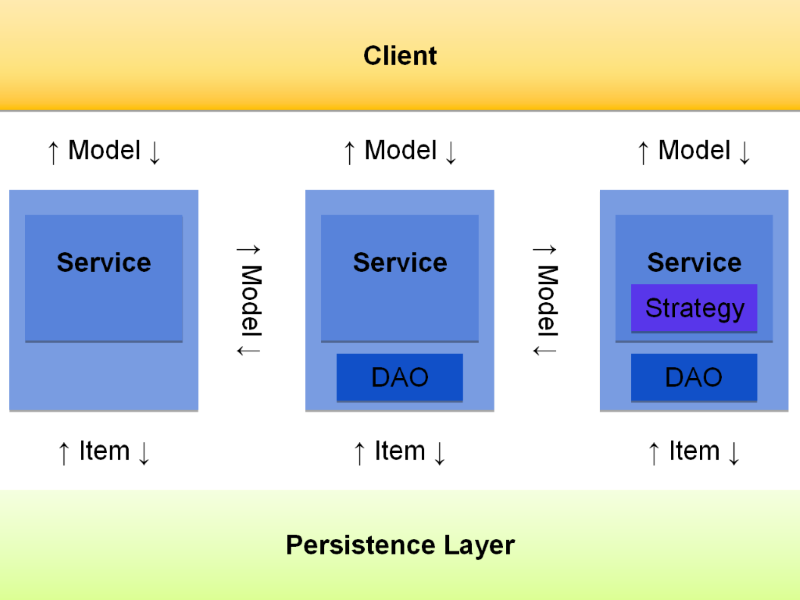
The ServiceLayer can be seen as a layer of services built on top of the persistence layer. These services are further divided into subcomponents.
In this context, a client refers to any software component that interacts with the ServiceLayer, such as:
A service encapsulates the logic for performing specific business processes and provides this logic through public methods, typically defined in a Java interface. These methods generally operate on model objects, like products or orders.
Services are designed to abstract away the persistence layer, meaning they focus purely on business logic without handling database operations directly. The goal is to minimize the coupling between services and the underlying persistence layer.
SAP Commerce exposes its full functionality through services, which can be categorized into three types:
Service methods should be designed to be as fine-grained as possible to promote reusability.
Extensions must expose their functionality as services. Each extension can provide multiple services, depending on the needs of the business logic.
While services can interact with other services, it’s recommended to keep these interactions to a minimum to avoid tightly coupled components.
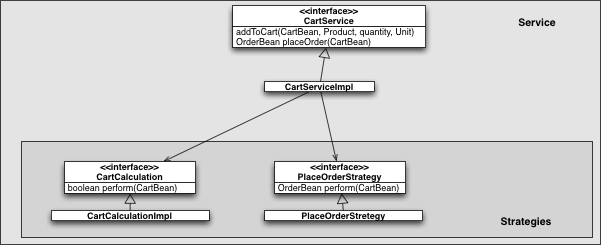
A service can delegate tasks to smaller components called strategies. These strategies are more focused and specialized, making them easier to adapt or replace without affecting the rest of the system. From the client's perspective, the service still offers a stable API, while internally, the functionality is divided into smaller, more manageable parts.
A DAO is an interface used for interacting with the storage backend (e.g., database). It handles tasks like saving, removing, and retrieving models. DAOs encapsulate SQL or FlexibleSearch queries, ensuring that the persistence logic remains separate from the rest of the application.
In SAP Commerce, DAOs use the Type System for persistence, meaning they don't implement custom logic but simply call the persistence layer to interact with the database.
Models are Java objects that represent items (like products or orders). They contain all attributes of an item, regardless of the extension it's associated with, providing unified access to the data. Models are typically Plain Old Java Objects (POJOs) and are easy to use without any storage requirements, which makes them suitable for testing and debugging.
Models are used by DAOs, services, strategies, converters, and facades for data processing and management.
The ServiceLayer provides an API for developing services, making it easy to implement business logic in a clean and structured way. You can follow these procedures to work with the ServiceLayer effectively:
Before using the ServiceLayer, it’s assumed that you have basic knowledge in the following areas:
items.xml file.Before starting with ServiceLayer-related tasks, you may need to configure and set up your extension. Begin by preparing your extension as described in the "Preparing an Extension for ServiceLayer Examples" document.
The ServiceLayer is a crucial API for implementing business logic. It allows developers to encapsulate business processes in Java classes called services. Each service addresses a specific, well-defined requirement, ensuring a modular and scalable architecture.
The ServiceLayer covers several key topics and functionalities, including:
When implementing new business logic, the ServiceLayer allows you to encapsulate functionality into Java-based services. These services provide an interface for interacting with the underlying persistence layer, making the logic reusable and decoupled.
Previously, the Jalo Layer managed both persistence and business logic. The introduction of the ServiceLayer separates these concerns, moving all business logic to the ServiceLayer. This migration significantly reduces the public API size and improves code maintainability.
For every database operation (committed or otherwise), an After Save Event is triggered. These events provide information about:
You can collect these events and handle them according to your business requirements, enabling advanced functionality such as change tracking or cascading updates.
The ServiceLayer provides several built-in services, divided into the following categories:
While these services cover most standard use cases, developers can implement their own services to extend functionality as needed.
To make the most of the ServiceLayer, developers can follow step-by-step guides for common tasks such as:
These guides ensure a smooth development process while leveraging the ServiceLayer’s capabilities.
Extending an existing service in involves creating a new service implementation that builds upon the original functionality. You implement custom behavior by overriding methods, using dependency injection to wire the service, and ensuring that your new service integrates seamlessly into the platform’s ecosystem. The key to successful service extension is maintaining loose coupling, adhering to Spring’s DI principles, and ensuring proper integration within the Hybris service architecture.
The purpose of the facade and service layers (SAP Commerce Cloud) are both integral to the architecture, but they serve distinct roles. To clarify, here’s a detailed comparison and explanation of their individual and overlapping functionalities:
In software architecture, both services and facades play key roles in organizing code and ensuring ease of use for clients. A service encapsulates business logic and often acts as a layer for communicating with external systems or databases, providing a public API. A facade, on the other hand, simplifies complex interfaces or integrates multiple services into one cohesive, easier-to-use API for consumers. While a service focuses on functionality, a facade hides complexity and provides a streamlined interface. Both are critical for achieving loose coupling, scalability, and flexibility in a Hybris solution.
Extending an existing service typically involves creating a custom implementation of an interface or class that the service exposes. Here's a step-by-step guide on how to extend an existing service:
To extend a service, you should begin by creating a custom extension if one does not already exist. This extension will hold your custom service implementation and configurations.
hybris command line tool, create a new extension or use an
existing one.
/src, /resources,
/web, etc.).
ProductService, OrderService, or CartService.
Let's say you are extending ProductService:
Step 1: Create a new service interface (optional, if you want to provide new behavior alongside the original one):
public interface CustomProductService extends ProductService {
    // Define custom methods or override existing ones.
}
Step 2: Implement the interface:
@Service("customProductService")
public class DefaultCustomProductService extends DefaultProductService implements CustomProductService {
    // Override methods to provide custom functionality
    @Override
    public ProductModel getProductForCode(String code) {
        // Custom behavior or call the base method
        ProductModel product = super.getProductForCode(code);
        // Add custom processing if needed
        return product;
    }
}
@Service to make it eligible for dependency injection in
other components or services.
For example, the @Service annotation makes the service available for injection into controllers, other
services, or DAOs:
@Service("customProductService")
public class DefaultCustomProductService extends DefaultProductService {
    // Your custom methods
}
After creating your custom service class, you need to tell the Spring container to use your custom implementation instead of the default one.
Update the Spring beans configuration to override the original service bean with your custom service.
Example: In spring.xml or a custom XML configuration file:
<bean id="productService" class="com.example.services.DefaultCustomProductService" />
Alternatively, you can use the @Qualifier annotation if you have multiple beans of the same type and
need to specify which one to inject.
@Autowired
private CustomProductService customProductService;
beforeSave or
afterUpdate, where you can inject custom behavior.
services are responsible for encapsulating business logic and providing reusable functionality, while facades simplify and unify access to these services for the client layer. The two are often used together: the service layer handles the core business operations, and the facade layer simplifies these operations for external consumers, improving modularity, flexibility, and maintainability in Hybris-based systems.
the Service Layer is used to implement business logic that interacts with data and other services. Its main purpose is to offer a clean separation of business logic from other layers, such as the persistence layer or the presentation layer.
Services typically provide a broad and coarse-grained interface to external systems. They abstract away details like database access or network calls, focusing on providing a high-level API for other components like facades, controllers, or external systems.
The Facade Layer serves as an abstraction layer between the presentation layer (such as web controllers or UI components) and the backend business logic. A facade simplifies the interactions with business services and models.
CartFacade may interact with ProductService, CartService, and PromotionService,
consolidating their functionality under a single API.
| Aspect | Service | Facade |
|---|---|---|
| Primary Role | Encapsulates business logic and provides an API for interacting with backend systems or services. | Simplifies or consolidates complex service APIs, making them easier to use for external components. |
| Complexity | Often contains detailed, coarse-grained operations and can be complex. | Hides complexity by offering a simplified, user-friendly API to interact with one or more services. |
| Interaction Level | Directly interacts with underlying data sources (e.g., databases, external systems). | Interacts with multiple services, consolidating them into a unified interface. |
| Focus | Focuses on implementing business logic or workflows. | Focuses on exposing simplified interactions with backend components. |
| Business Logic | Services encapsulate business functionality. | Facades don’t encapsulate business logic but organize and simplify access to it. |
| Usage | Used internally to perform the actual business operations. | Used to expose a simplified interface for external clients (e.g., web controllers). |
Facades often rely on services: A facade may use one or more services to implement the logic needed for its simplified API. For instance, a CartFacade could use the CartService, ProductService, and PricingService to provide a simple interface for managing a shopping cart.
Service is more detailed, facade is more user-friendly: The service layer is responsible for handling complex logic, whereas the facade wraps that logic to offer a simplified and more coherent interface to the presentation layer, external systems, or end-users.
Service: The ProductService may provide complex operations such as fetching product data, updating product prices, or checking stock availability. It encapsulates the logic for interacting with the database or third-party systems (e.g., an ERP system).
Facade: The ProductFacade exposes a simpler API, perhaps providing methods
like getProductDetails(productCode) or searchProducts(query). This facade abstracts
away the complex interactions with the ProductService and may aggregate data from multiple
services, offering a simplified interface for the frontend or other services.
The Region Cache (Hybris) offers a flexible and highly configurable caching solution that optimizes the performance of the system. By organizing cache into regions, SAP Commerce allows developers to handle high-traffic and volatile data separately from more stable data, ensuring efficient memory usage and better response times.
The SAP Commerce Region Cache is an advanced caching mechanism that divides the cache into different regions, each designed to store a specific set of data types. This division helps optimize caching by allowing granular control over which types of data are cached and for how long, preventing issues such as excessive eviction of important data.
Modular and Configurable:
The Region Cache allows developers to configure and extend
cache regions with flexibility. Different regions can be set up for various data types like products,
categories, or sessions.
Eviction Strategies:
It supports different eviction strategies to manage memory, such as:
Distributed Cache Support:
It allows for distributed cache configurations, integrating
third-party solutions like Hazelcast, Memcached, or Coherence
for large-scale systems, though serialization is required for query result regions.
Full Control and Monitoring:
The region cache provides full control over cache
partitions, and tools for monitoring and invalidation allow for more detailed management.
Each cache region stores a different kind of data, and you can configure each region with distinct properties:
SAP Commerce provides pre-configured cache regions:
You can easily modify or add new cache regions as per your requirements. This is done in the core-cache.xml
and advanced.properties files. For example, you can create a dedicated region cache
for high-traffic data types like Cart and CartEntry, which are volatile and should
not pollute the generic Entity Region cache.
Get Type Codes:
First, retrieve the type codes for the Cart and CartEntry items (you can
find this in the BackOffice Type Search).
Spring XML Configuration:
Add the following Spring bean definition to declare a dedicated
cache region for Cart and CartEntry:
<!-- New cache region dedicated for Cart -->
<bean name="cartCacheRegion" class="de.hybris.platform.regioncache.region.impl.EHCacheRegion" lazy-init="true">
    <constructor-arg name="name" value="cartCacheRegion" />
    <constructor-arg name="maxEntries" value="1000" />
    <constructor-arg name="evictionPolicy" value="LRU" />
    <constructor-arg name="statsEnabled" value="true" />
    <constructor-arg name="exclusiveComputation" value="false" />
    <property name="handledTypes">
        <array>
            <value>43</value> <!-- Cart -->
            <value>44</value> <!-- CartEntry -->
        </array>
    </property>
</bean>

<!-- Register cache region -->
<bean id="cartCacheRegionRegistrar" class="de.hybris.platform.regioncache.region.CacheRegionRegistrar" c:region-ref="cartCacheRegion" />
Update the Global Context:
Ensure this cache region configuration is included in the
global context, as shown below:
# Cache regions need to go to the global context
custom.global-context=custom-cache-spring.xml
Outcome:
After setting up this configuration, Cart and CartEntry items will no longer
impact the general Entity Region cache, improving the performance of less volatile data (like products and
categories).
The Region Cache allows monitoring and invalidation of cache regions:
By creating a dedicated cache region for high-traffic or volatile data like Cart and CartEntry, you prevent performance bottlenecks that arise from the eviction of important, low-volatility data in the default Entity Region Cache. This separation ensures that more stable data (such as Product and Category) can remain in the cache longer without being prematurely evicted by volatile items.
Why a New Cache Region?
By default, the Entity Region Cache captures all types
of items (instances of Item types). This approach works fine for smaller catalogs and systems with limited traffic.
However, as the system grows, especially with large catalogs or high user traffic, the eviction of items (such as
Product, Category, Feature) from the entity region can cause
significant performance degradation. High volatility data, such as Cart, CartEntry,
PromotionResult, and PromotionAction, should be stored in separate, dedicated
caches to prevent them from affecting the generic Entity Region cache.
Identify Type Codes:
First, you need to obtain the type codes for the
items you want to dedicate a cache region to (e.g., Cart and CartEntry). You
can find these type codes in the BackOffice Type Search.
Configure Cache Region in Spring XML:
Next, you define a new cache region in your Spring
XML configuration file (custom-cache-spring.xml). For example, here’s how you would configure a
dedicated cache region for Cart and CartEntry:
<!-- New cache region dedicated for Cart -->
<bean name="cartCacheRegion" class="de.hybris.platform.regioncache.region.impl.EHCacheRegion" lazy-init="true">
    <constructor-arg name="name" value="cartCacheRegion" />
    <constructor-arg name="maxEntries" value="1000" />
    <constructor-arg name="evictionPolicy" value="LRU" />
    <constructor-arg name="statsEnabled" value="true" />
    <constructor-arg name="exclusiveComputation" value="false" />
    <property name="handledTypes">
        <array>
            <value>43</value> <!-- Cart -->
            <value>44</value> <!-- CartEntry -->
        </array>
    </property>
</bean>
In this configuration:
cartCacheRegion is the name of the new cache region.maxEntries defines the maximum number of entries in this region.evictionPolicy specifies the eviction strategy, in this case, LRU
(Least Recently Used).
handledTypes lists the types that will be stored in this cache region,
identified by their type codes (43 for Cart, 44 for CartEntry).
Register the Cache Region:
To ensure the region is registered, you need to add a CacheRegionRegistrar
in your Spring configuration:
<!-- Register cache region -->
<bean id="cartCacheRegionRegistrar" class="de.hybris.platform.regioncache.region.CacheRegionRegistrar" c:region-ref="cartCacheRegion" />
Add Configuration to Global Context:
Once the new cache region is defined, it needs to be
included in the global context to be recognized by the system. This can be done by updating the
project.properties:
# Cache regions need to go to the global context
custom.global-context=custom-cache-spring.xml
Result:
With this configuration in place, Cart and
CartEntry types will no longer affect the general Entity Region Cache. This
will prevent frequent evictions of stable, low-volatility data, improving performance for product-related data
while handling the volatile Cart data separately.
Relation caching improves the performance of SAP Commerce Cloud by storing results for related items (like users and user groups) separately, without triggering unnecessary cache invalidations. The system provides flexibility through configuration properties that allow enabling, disabling, and customizing relation caching at different levels. By carefully configuring cache size and invalidation strategies, you can ensure your system scales efficiently while maintaining the integrity of related data caches.
Relation caching Cloud stores results of FlexibleSearch queries that involve relationships between
items, particularly focusing on collections like user and user group relations (e.g.,
PrincipalGroupRelation). This specialized cache avoids the overhead of checking modification counters
during cache validation, thus improving performance, especially when frequent modifications (like user creation) are
made without affecting cached relation results. Relation caching is designed to prevent unnecessary cache
invalidations that can occur with other types of cache strategies and ensures better performance when dealing with
relations between items such as users and user groups.
Performance Improvement
PrincipalGroupRelation) to be stored and reused without re-validating the cache on
every query.
Modifications and Invalidation
Clustered Environments & Invalidation
Cache Metrics
regioncache.stats.enabled=true
Global Configuration
Relation caching is enabled by default Cloud, but you can configure it using the following properties:
relation.cache.enabled=true  # Enables relation caching globally
relation.cache.default.capacity=10000  # Defines how many items the relation cache can store by default
Per-Relation Configuration
relation.cache.<RelationTypeCode>.enabled.
You would replace <RelationTypeCode> with the name of the relation you wish to
configure, as defined in the items.xml file.
relation.cache.PrincipalGroupRelation.enabled=true  # Enables caching for PrincipalGroupRelation
relation.cache.PrincipalGroupRelation.capacity=50000  # Defines how many results to store for PrincipalGroupRelation
Customizing Relation Cache for Other Relations
PrincipalGroupRelation.
This can be done by implementing the cache for specific relations and setting their respective cache
sizes.
Limitations
ERROR [RegionCacheAdapter] Configuration is not valid with the given licence - cache size limit exceeded
cache.legacymode=true
to the local.properties file, though using the default region cache is recommended for
optimal performance.
By customizing these components, you can ensure that your relation cache is optimized for your specific needs, especially in systems with heavy loads or complex relationships between items.
Restrictions Cloud are a powerful tool to filter and limit search results based on user roles or session context. They work seamlessly with FlexibleSearch queries to restrict data across the platform, not just in Backoffice. Restrictions can be managed dynamically, enabling or disabling them as needed, and they can be applied globally or to specific user groups or sessions. Custom restrictions can be created using both the SAP Commerce API and ImpEx for flexible control over data access and visibility.
Restrictions Cloud provide a flexible mechanism to limit search results based on the type of data being searched and the user’s context (e.g., which user or user group is logged in). These restrictions are automatically applied to FlexibleSearch queries and help filter data without requiring modifications to the business layer. They operate transparently by modifying the WHERE clause of FlexibleSearch queries to ensure that the results respect the user’s access or session context.
Functionality of Restrictions
Example:
A basic FlexibleSearch query:
SELECT {p:pk} FROM {Product AS p} WHERE {p:code} LIKE '%test%'
With a restriction on the description field:
SELECT {p:pk} FROM {Product AS p} WHERE {p:code} LIKE '%test%' AND {p:description} NOT NULL
Scope of Restrictions
Item.getProperty() or LocalizableItem.getLocalizedProperty() because they
bypass FlexibleSearch and directly query the database.
Session-Specific Restrictions
{user} = ?session.user
{country} IN (?session.countries)
Caution: Ensure that any custom session attributes (like countries) are present
in the session; otherwise, the query will fail.
Disabling Restrictions
During development, testing, or debugging, you may want to disable restrictions temporarily to see unfiltered data. This can be done with:
searchRestrictionService.disableSearchRestrictions();
Once you are done, you can enable restrictions again:
searchRestrictionService.enableSearchRestrictions();
Admin User Exceptions
You can assign an admin user to the session like this:
userService.setCurrentUser(userService.getAdminUser());
Additionally, for executing queries in the context of an admin user, you can use SessionExecutionBody:
sessionService.executeInLocalView(new SessionExecutionBody() {
    @Override
    public Object execute() {
        userService.setCurrentUser(userService.getAdminUser());
        // Perform query or action for admin user
    }
});
Restrictions can be created either through the SAP Commerce Cloud API or via ImpEx files. Here’s how both approaches work:
Creating Restrictions via API
SearchRestrictionModel, which
represents the restriction. Key attributes include:
active: Whether the restriction is enabled.code: A unique identifier for the restriction.principal: The user or user group the restriction applies to.query: The actual WHERE clause condition.restrictedType: The item type to which the restriction applies.Example:
final ComposedTypeModel restrictedType = typeService.getComposedTypeForClass(ProductModel.class);
final PrincipalModel principal = userService.getUserForUID("someUser");

final SearchRestrictionModel restriction = modelService.create(SearchRestrictionModel.class);
restriction.setCode("productRestriction");
restriction.setActive(true);
restriction.setQuery("{active} = true");
restriction.setRestrictedType(restrictedType);
restriction.setPrincipal(principal);
restriction.setGenerate(true);
modelService.save(restriction);
Creating Restrictions via ImpEx
INSERT_UPDATE SearchRestriction;code[unique=true];name[lang=de];name[lang=en];query;principal(UID);restrictedType(code);active;generate
;Frontend_Navigationelement;Navigation;Navigation;{active} IS TRUE;test_user;Language;true;true
This creates a restriction that applies to the Navigation type for the user
test_user, restricting access to navigation elements where active = true.
hac-web-spring.xml),
with limited visibility to other contexts unless explicitly referenced.
the Hybris application context hierarchy provides a modular, scalable approach to defining and managing beans across different components of the system. It enables isolation, reusability, and flexibility while maintaining a clear structure between core, web, and tenant-specific beans.
The Hybris Application Context hierarchy is structured in a way that allows for modularity and flexibility, separating different application layers into distinct contexts. These contexts define how beans (components and services) are registered, accessed, and made available to different parts of the system. Here’s a breakdown of the key components of this hierarchy:
core-spring.xml) are registered
in this context and are globally available to all other web application contexts.
For each extension with a web module (such as the HAC (Hybris Administration Console),
catalog extension, or custom extensions like yempty), there is a corresponding
WebApplicationContext.
These contexts are typically defined in *-web-spring.xml files, which define beans specific to
the web module or user interface functionality.
Each web application context can access the beans declared in the master context, but beans defined within other web application contexts are not visible. This means that each web context is isolated to its own scope.
hac-web-spring.xml.
catalog-web-spring.xml.
empty-web-spring.xml.
Hybris supports a multi-tenant architecture, where each tenant (master and slave) can have its own isolated application context.
Each tenant, whether master or slave, can have its own context
configuration. For instance, core-spring.xml is used to configure beans in the master
tenant, and similarly, beans can be defined in separate context files for the slave
tenant like slave-web-spring.xml.
yempty-spring.xml file for an empty extension or catalog-spring.xml for a catalog
extension.
hac-web-spring.xml) will not be available in another
context (e.g., catalog-web-spring.xml), unless explicitly imported or referenced.
Beans declared in the core module extension are globally accessible from any web application context. This ensures that core services are always available for use in various parts of the application.
However, when beans are defined in a specific web application context, they are not accessible by other web contexts unless explicitly referenced or imported.
The Classification System is a powerful tool that allows for dynamic and selective assignment of attributes to products. It is particularly useful for cases where only certain products need specific attributes, and it provides flexibility for managing product data in a modular way. By defining classification attributes (category features) and linking them to products or categories in the Product Catalog, the system provides efficient data modeling and allows for the easy management of product attributes that can change over time. This approach enhances both the flexibility and scalability of the product data structure.
the Classification System is used to manage product attributes in a way that allows dynamic assignment and fine-grained control over which products or product categories receive certain attributes. This is in contrast to the more static approach of adding attributes directly to the Product Catalog.
is another type system in SAP Hybris that organizes product attributes based on categories. These categories are referred to as classifying categories, and they are structured hierarchically, similar to the Product Catalog type system, which defines product categories.
allows for the creation of classification attributes (like "color") that can be assigned only to certain products or categories within the Product Catalog, without needing to add them to every product. This is beneficial in situations where only some products require certain attributes. For example:
This way, the classification system allows for flexible assignment of attributes to only those products that need them, instead of forcing every product to have all possible attributes.
Using the Classification System provides several key advantages:
Selective Attribute Assignment: You can define attributes for only specific products or categories. This is especially useful when not all products require the same attributes (e.g., "color" is relevant to mobile phones but not to processors).
Dynamic Attribute Management: When you define attributes as part of the classification system rather than the product model, you can more easily manage product attributes dynamically at runtime. If an attribute becomes unnecessary or irrelevant, it can be removed or altered without impacting all products.
Attribute Flexibility: Classification attributes allow for flexible, dynamic product modeling, ensuring that attributes can be added, modified, or removed without altering the product item types in the items.xml configuration.
The Classification System works in a hierarchical manner, similar to the Product Catalog:
This separation between product attributes and classification attributes enables you to manage product data more efficiently and with less duplication. The classification system also helps in maintaining a clear distinction between static attributes (which are part of the product model) and dynamic attributes (which can be managed and updated through the classification system).
You should prefer the Classification System in the following cases:
Selective Product Attributes: When you only need to define an attribute for a specific subset of products rather than for every product in the catalog.
Short-Lived or Dynamic Attributes: When the lifetime of an attribute is uncertain, and it may become obsolete after a few weeks or months. The Classification System allows you to add or remove attributes easily without modifying the product model.
Runtime Attribute Assignment: When you need the flexibility to add attributes dynamically at runtime, based on evolving business requirements.
The Classification System hierarchy includes the following components:
Requirement: You have a variety of products in your catalog, and some of them (e.g., mobile phones, cameras) require a "color" attribute, while others (e.g., processors, RAM) do not. Instead of adding the color attribute to all product types in the items.xml, you use the Classification System to define the "color" classification attribute and assign it only to those products that need it.
Solution:
In this way, the classification attribute "color" is conditionally assigned to products, providing flexibility and reducing unnecessary data.
Synchronization is a critical process in SAP Hybris that ensures the Online catalog remains in sync with the latest content changes made in the Staged catalog. It provides an efficient mechanism for testing, approving, and transferring catalog content with minimal disruption to the live storefront. The process can be handled manually via the HMC or automated using cron jobs or cockpits for content and product catalog synchronization.
Staged Catalog Version:
Online Catalog Version:
Both catalog versions typically contain the same content, but the Staged version is a test version, and the Online version is the live version. When updates are made to the Staged version, they must be synchronized to the Online version for those changes to reflect on the storefront.
Synchronization involves copying the catalog content from one catalog version (typically Staged) to another (usually Online). When synchronization is initiated, the content in the Staged catalog version is copied over to the Online catalog version, making it available to the public.
Search and Open Catalog:
apparelProductCatalog).
Identify Active Catalog Version:
Open Staged Catalog Version:
Create New Synchronization:
Synchronize:
Start Synchronization:
Monitor Progress:
is an essential component for optimizing search functionality. By indexing product and catalog data, Solr improves the performance and scalability of eCommerce websites. The three indexing strategies—Full, Update, and Delete indexing—allow for flexible management of the search index. Proper configuration and scheduling of cron jobs ensure that Solr stays synchronized with Hybris data, providing users with fast, accurate search results.
In the context of eCommerce sites, search functionality is paramount, especially when dealing with large product catalogs. SAP Hybris leverages Apache Solr, an open-source search platform, to enhance the search experience by allowing faster product searches. Solr is used to index product data and provide faster, more efficient search capabilities compared to directly querying the database.
Data Sources:
Communication Flow:
Performance:
Hybris supports three types of indexing strategies for Solr:
Full Indexing:
Update Indexing:
Delete Indexing:
Hybris provides pre-configured cron jobs for performing the different types of indexing:
These cron jobs automate the indexing process and can be scheduled at regular intervals, ensuring that Solr stays up-to-date with the latest data from the Hybris database.
decorators are ideal for pre-processing data in the CSV file, while translators are used for post-processing the Hybris item once it is created from the CSV data.
If you need to combine price and currency into a single display value, a decorator would modify the raw CSV data before it's processed into the item.
Decorator Class Example:
public class PriceDisplayValueDecorator extends AbstractImpExCSVCellDecorator {
    private String currencyIndex;

    @Override
    public void init(AbstractColumnDescriptor column) throws HeaderValidationException {
        super.init(column);
        currencyIndex = column.getDescriptorData().getModifier("currency_index");
    }

    @Override
    public String decorate(int index, Map<Integer, String> map) {
        final String currency = map.get(currencyIndex);
        final String priceValue = map.get(index);
        return priceValue + currency;  // Modify the price cell value by appending the currency
    }
}
Impex Syntax:
INSERT_UPDATE CustomPrice; code[unique=true]; currency; priceValue[cellDecorator=com.custom.hybris.impex.PriceDisplayValueDecorator, currency_index=2];
;price1; €; 100
;price2; €; 87
;price3; $; 99
After applying the decorator, the data would be updated as follows:
INSERT_UPDATE CustomPrice; code[unique=true]; currency; priceValue;
;price1; €; 100€
;price2; €; 87€
;price3; $; 99$
When you need to encode user passwords or perform other complex transformations on an item’s data after it has been created.
Translator Class Example:
public class PasswordEncoderTranslator extends AbstractValueTranslator {
    @Override
    public Object importValue(String cellValue, Item item) throws JaloInvalidParameterException {
        User user = (User) item;
        String encodedPassword = encodePassword(cellValue);
        user.setPassword(encodedPassword);
        return item;
    }

    @Override
    public String exportValue(Object item) throws JaloInvalidParameterException {
        return "*********";  // Don't export password
    }
}
Impex Syntax:
INSERT_UPDATE Unit; uid[unique=true]; password[translator=com.custom.hybris.impex.PasswordEncoderTranslator];
;user1; password1
;user2; password2
After importing, the password will be encoded and set on the User item model.
| Feature | Impex Decorator | Impex Translator |
|---|---|---|
| Lifecycle Stage | Executes before the data is converted into an item. | Executes after the row has been converted into an item. |
| Input/Output | Modifies raw CSV data (rows and cells). | Modifies item attributes (after the item is created). |
| Primary Use | Cell-level transformation (e.g., combine price and currency). | Item-level transformation (e.g., password encoding). |
| Execution Context | Works on the raw data before it's imported into Hybris. | Works on the model object (item) once it has been created from the raw data. |
SAP Commerce (Hybris) utilizes an event-driven architecture, where events are published by a source and listened to by one or more listeners that act upon them. This system is based on the Spring event system but enhanced to handle SAP Commerce-specific logic. Events can be local (within the same node) or clustered (across multiple nodes in a distributed system), providing flexibility for communication between components in either single-node or multi-node setups.
This event-based communication enables loose coupling between components, allowing for scalable, maintainable applications.
SAP Commerce's event system provides a powerful mechanism for communication between components in a loosely coupled manner. The integration of interceptors with custom events allows business logic to be implemented at various stages of the lifecycle of model objects. Additionally, cluster-aware events enable scalable and asynchronous event processing, essential for distributed systems and large-scale commerce environments. However, when using cluster-aware events, it is important to consider the trade-offs in terms of reliability and use appropriate tools like the Task Service for critical business processes.
In SAP Commerce, interceptors are used to handle various stages of the lifecycle of model objects (which represent items in the SAP Commerce system). Interceptors can modify models, interrupt the lifecycle, or even publish custom events based on conditions during the lifecycle steps.
For instance, when certain business rules are violated during the model lifecycle (e.g., saving a Band
item with negative sales), an interceptor could throw an exception. Alternatively, custom events can be triggered
when specific conditions are met (e.g., album sales exceed a threshold).
To demonstrate creating a custom event for a scenario where a band's album sales exceed a threshold, you could:
BandAlbumSalesEvent.
It would include necessary attributes (e.g., the sales value).
An interceptor is created to monitor when the Band item's album sales exceed a certain threshold.
When this occurs, the interceptor can raise a custom event (like BandAlbumSalesEvent) if the condition
is satisfied.
public class BandAlbumSalesInterceptor implements Interceptor<Band> {
    @Override
    public void onEvent(Band model) throws InterceptorException {
        if (model.getAlbumSales() > 1000000) {
            // Publish a custom event
            eventService.publishEvent(new BandAlbumSalesEvent(model));
        }
    }
}
A listener will handle the event. For example, when the BandAlbumSalesEvent is published, the listener
could perform actions such as sending notifications or logging.
public class BandAlbumSalesEventListener implements EventListener<BandAlbumSalesEvent> {
    @Override
    public void onEvent(BandAlbumSalesEvent event) {
        // Logic to handle the event, such as logging or sending a notification
    }
}
The interceptor and event listener are registered in the Spring context.
<bean id="bandAlbumSalesInterceptor" class="concerttours.interceptors.BandAlbumSalesInterceptor"/>
<bean id="BandInterceptorMapping" class="de.hybris.platform.servicelayer.interceptor.impl.InterceptorMapping">
    <property name="interceptor" ref="bandAlbumSalesInterceptor"/>
    <property name="typeCode" value="Band"/>
</bean>

<bean id="bandAlbumSalesEventListener" class="concerttours.events.BandAlbumSalesEventListener">
    <property name="modelService" ref="modelService"/>
</bean>
The configuration ensures that the interceptor is invoked at the correct lifecycle stage of the Band
model and that the event listener will process the event once it's published.
By carefully designing and optimizing interceptors, many of these challenges can be mitigated. However, overuse or poor implementation of interceptors can lead to significant maintenance and performance issues.
SAP Commerce supports cluster-aware events, allowing events to be processed across multiple nodes in a cluster environment. By default, events are processed synchronously, meaning that the main thread waits for the event to be handled before proceeding. However, synchronous event handling can lead to delays, especially if a listener is slow or if there is a high volume of events.
Cluster-aware events allow asynchronous processing of events, which can be particularly useful in a multi-node cluster to avoid waiting for events to be handled on a specific node. This can improve performance and system responsiveness by distributing the event handling workload across multiple nodes.
defines the structure for reusable content pages. It acts as a blueprint for creating various content pages, ensuring consistency across the pages. The following points explain its significance:
frontendTemplateName,
typically a JSP file, which determines how the page is rendered.
ContentPage,
ProductPage, CategoryPage, CatalogPage).
Velocity templates, identified by the .vm extension, are used within the CMS cockpit and SmartEdit to
define page structures. They are essentially text files with embedded HTML tags. Here’s how they function:
.vm files only take effect after an Impex import. Each
time a .vm file is modified, the Impex must be executed again to reflect changes.
Content Slot is a container for components. It can be defined at different levels:
This refers to content slots that need to be available for all pages derived from a particular template. The positioning of these slots is defined in the template and used on the frontend for rendering.
Content slots defined at the page level are specific to the page itself. These slots are not shared with other pages and are unique to the particular content page.
The contentSlotName is used to restrict content slots to specific components within a template. For
instance, in a ProductDetailsPageTemplate, content slots might be restricted to specific components
like ProductVariantSelectorComponentModel or ProductAddToCartComponentModel.